How to Install Pneumatic Diaphragm Control Valve Positioners
On this page
Pneumatic diaphragm control valves are essential components in automated process control systems, widely used across industries such as oil and gas, chemicals, power generation, and water treatment. To enhance the accuracy and responsiveness of these control valves, positioners play a crucial role. This guide details the composition, working principle, installation procedures, and adjustment methods of positioners to assist users in effectively installing and calibrating pneumatic diaphragm control valves.
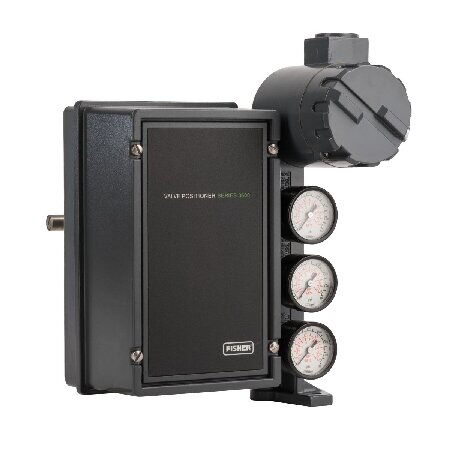
A positioner is a critical accessory for pneumatic diaphragm control valves, responsible for converting the 4-20mA DC signal from the controller into a pneumatic signal. This conversion allows precise control of the valve's position. The main components of a positioner include:
Motor: Driving the torque motor within the positioner, generating the necessary electromagnetic field.
Pilot Valve: Controlling the airflow, regulating its volume to ensure precise valve operation.
Flapper: Adjusting airflow by regulating the gas flow through the nozzle.
Actuator: Converting the pneumatic signal into mechanical motion to operate the valve.
Feedback Rod: Providing positional feedback from the actuator to the positioner to fine-tune the valve's position.
Spring: Offering rebound force to stabilize the valve's position and ensure system accuracy.
The positioner's operation involves several precise steps, focusing on converting the electrical signal from the control system into a pneumatic signal to control the diaphragm valve accurately. Key steps include:
Signal Reception: The positioner receives the 4-20mA DC signal from the controller, which determines the valve's opening degree.
Electromagnetic Action: As the signal strength increases, the torque motor generates an electromagnetic field that moves the flapper away from the nozzle.
Airflow Regulation: The increased gap between the flapper and nozzle allows more airflow, reducing pressure within the pilot valve and pushing the stem to the right.
Valve Operation: The movement of the stem drives the valve plug, and the pressure is transmitted to the actuator.
Actuator Response: Increased pressure in the actuator's chamber lowers the push rod, and the displacement is relayed to the sliding plate via the feedback rod, affecting the range feedback.
Balance Adjustment: When the forces of the range spring and torque motor balance, the flapper returns to its original position, reducing the gap with the nozzle and increasing pressure to return the stem to its initial position. The valve plug blocks the base, halting the pressure input. The positioner maintains stability when the system reaches equilibrium.
Proper installation of the positioner is critical for the smooth operation of the pneumatic diaphragm control valve. The installation process involves preparing the equipment, mounting the positioner, and connecting the pneumatic lines.
Pneumatic Line Cleaning: Ensure that pneumatic lines are clean and free of debris to prevent damage or leaks. Verify that the pipe diameter meets the positioner's ventilation requirements.
Filter Regulator Installation: Install an air filter regulator before the positioner's air supply interface to prevent contaminants such as moisture and oil from entering the positioner, ensuring a clean and stable air source.
Filter Regulator Setup: Temporarily mount the air filter regulator above the actuator to ensure a stable air supply.
Feedback Pin Installation: Install the feedback pin on the actuator and valve body nut, inserting it into the positioner's feedback rod slot. Ensure correct insertion to minimize lag.
Positioner Mounting: Secure the positioner to the accessory bracket with screws, ensuring it is firmly attached. After installation, check that the feedback rod is level when the valve is at 50% travel, adjusting the bracket and feedback rod connections as necessary to maintain level.
Connect Pneumatic Lines: Connect the air filter regulator to the positioner inlet and ensure that the positioner outlet is connected to the actuator's air chamber to guarantee effective transmission of the pneumatic signal.
Once the pneumatic diaphragm control valve and positioner are installed, the next crucial step is adjusting the valve's operation. This process ensures accurate full closure and full opening positions for optimal control. Proper adjustment enhances the valve's performance, responsiveness, and control accuracy. The following steps outline the adjustment procedures:
Signal Input: Input a 4mA signal from the controller to set the valve's full closure position.
0% Adjustment: Adjust the 0% setting by turning the 0% adjustment knob. Turning the knob clockwise stretches the 0% spring, raising the 0% setting, while counterclockwise rotation compresses the spring, lowering the 0% setting.
Signal Input: Input a 20mA signal from the controller to set the valve's full opening position.
Span Adjustment: Confirm the actuator's travel scale and adjust the span setting using the span knob. If the travel indication is below the specified scale, rotate the span knob clockwise; if above, rotate counterclockwise.
Re-adjustment: After adjusting the span, the 0% setting may shift, requiring re-adjustment. Typically, several adjustments to both 0% and span settings are needed to achieve accuracy.
Lock Adjustment: Once adjustments are complete, tighten the lock screws between the 0% and span adjustment components to ensure stability and prevent displacement due to vibration or other factors.
By following these detailed installation and adjustment steps, users can ensure the stable and efficient operation of pneumatic diaphragm control valves and their positioners within industrial automation systems. As a key component, the positioner significantly enhances the control precision and response speed of the valve, optimizing performance and ensuring the stability and safety of the production process.

